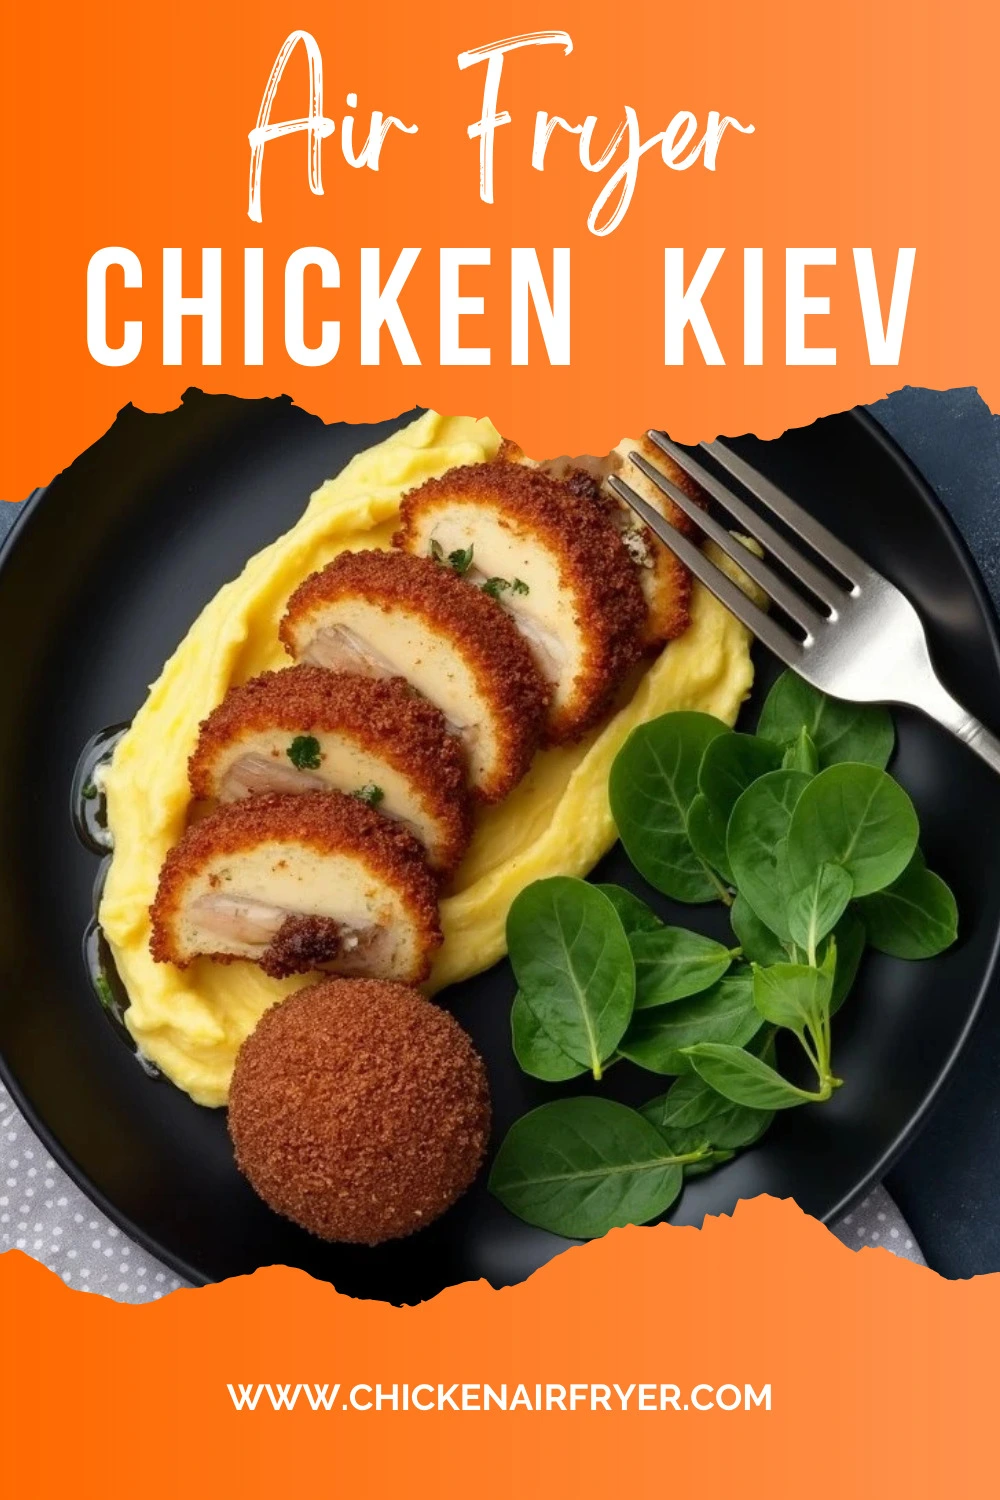
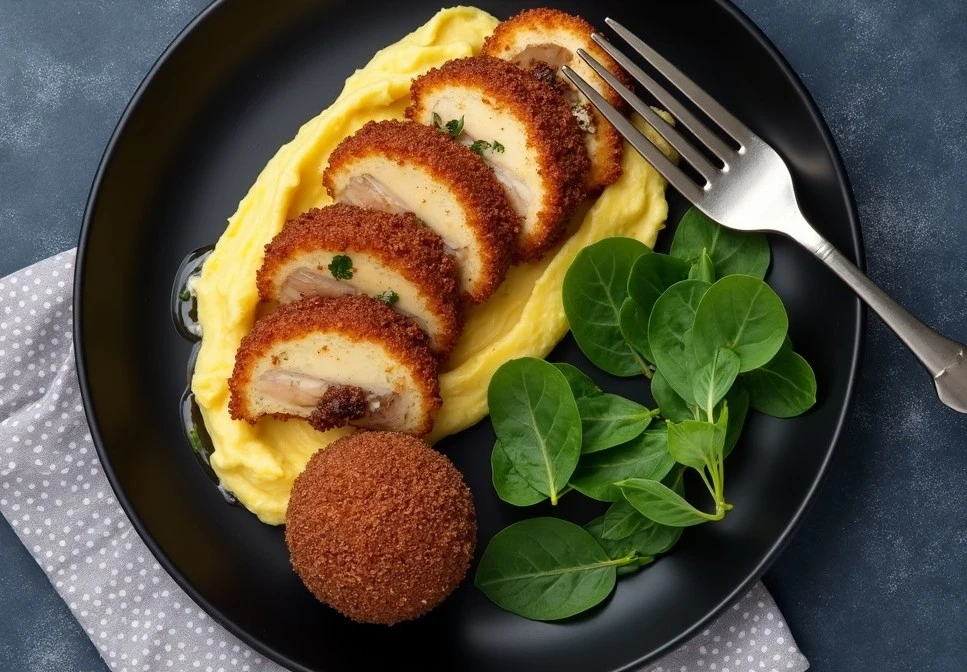
Today we’re making the air fryer chicken kiev recipe; it’s super tasty and fun to make! We take chicken, stuff it with garlic butter, coat it in crunchy breadcrumbs, and cook it in the air fryer.
You can make this dish for a special family dinner or when friends come over. What makes this recipe so special is that when you cut it open, warm garlic butter pours out, making a sauce for your chicken!
Ingredients Notes
Make sure to choose the right ingredients at the store for our chicken kiev!
🔹For the butter part, look for unsalted butter because it lets us control how salty our food is. If you only have salted butter at home, that’s okay too! Just use a tiny bit less salt in the recipe. Make sure your butter is soft enough to mix but not melty; leaving it on the counter for about 30 minutes should do the trick.
🔹Fresh garlic is super important for that yummy flavor. Look for firm garlic bulbs without any green sprouts. We’ll be chopping it up very small. If you don’t have fresh garlic, you can use about 1 teaspoon of garlic powder instead, but fresh tastes much better!
🔹For the chicken, try to find pieces that are about the same size so they cook evenly. Chicken breasts that aren’t too thick work best. If they’re frozen, make sure to thaw them completely in the fridge before you start cooking.
🔹Breadcrumbs give our chicken its crispy coat. You can use plain ones or the Italian-style kind that have herbs mixed in. If you have stale bread at home, you can even make your own breadcrumbs by breaking it into crumbs and toasting them a bit!
🔹The eggs help the breadcrumbs stick to the chicken. Fresh eggs work better than older ones. Give them a good beating until the white and yellow parts are completely mixed together.
🔹The cooking spray is our friend for air frying! It helps make the outside crispy without using lots of oil. If you don’t have cooking spray, you can brush a tiny bit of oil on the chicken instead.
How to Cook Air Fryer Chicken Kiev
🔹First, let’s get our garlic butter ready. Mix some soft butter with finely chopped garlic and parsley in a bowl. Add a little salt and pepper too. Then put this mixture on some plastic wrap, roll it into a small log shape, and pop it in the freezer for about 15 minutes until it gets firm.
🔹While the butter is chilling, take your chicken breasts and place them between two pieces of plastic wrap. Use a meat mallet (or a heavy pan if you don’t have one) to gently flatten the chicken until it’s about 1/4 inch thick all over.
Stuffing the Chicken
🔹Take your chilled butter from the freezer and cut it into four equal pieces. Place a piece of butter in the middle of each flattened chicken breast.
🔹Next, fold the sides of the chicken over the butter, then roll it up like you’re wrapping a present. Make sure the butter is completely covered by the chicken. If you need to, use toothpicks to keep everything closed up.
Coating Time
🔹Try to get three shallow bowls ready. Put flour in the first one, beaten eggs in the second, and breadcrumbs in the third.
🔹Roll each chicken piece in the flour first, making sure it’s completely covered. Then dip it in the egg mixture, letting any extra egg drip off. Finally, roll it in the breadcrumbs, pressing gently so they stick well.
🔹After all your chicken pieces are coated, put them in the refrigerator for at least 30 minutes.
Air Frying
🔹Turn on your air fryer and set it to 375°F. Let it heat up for a few minutes.
🔹Spray the air fryer basket with cooking spray, then carefully place your chicken pieces inside. Make sure they’re not touching each other. If your air fryer is small, you might need to cook in batches.
🔹Spray the tops of the chicken with a little more cooking spray. This helps them get nice and golden.
🔹Cook for about 10 minutes, then carefully flip each piece over, spray again with cooking spray, and cook for another 5-7 minutes. The outside should be golden brown, and if you have a food thermometer, the inside should reach 165°F.
🔹Take the chicken out of the air fryer and let it rest for about 5 minutes before serving.
Serving Suggestions
Your air fryer chicken kiev is ready, and now it’s time to think about what to serve with it. Here are some yummy ideas that go perfectly with this buttery chicken dish!
Side Dishes
🔹Mashed potatoes are a perfect friend for chicken kiev! The creamy potatoes soak up all that delicious garlic butter that flows out when you cut into the chicken. You can make simple mashed potatoes with just butter and milk, or add a little cheese if you like.
🔹Rice is another great choice. Plain white rice or rice with a few herbs mixed in will catch all the tasty butter sauce.
🔹Steamed veggies are a must! Try green beans, carrots, broccoli, or peas. The simple flavors of the vegetables balance out the rich chicken. Plus, they add pretty colors to your plate!
FAQs
Q1: Why does my butter leak out during cooking?
This happens sometimes! The most common reason is that the chicken wasn’t sealed well enough around the butter. Make sure to really fold and roll the chicken tightly around the butter. Chilling both the butter before stuffing and the prepared chicken before cooking helps a lot too. If a little butter leaks out, don’t worry; it will still taste amazing!
Q2: My breadcrumbs won’t stick! What am I doing wrong?
Make sure to follow the order: flour first, then egg, then breadcrumbs. The flour helps the egg stick to the chicken, and the egg helps the breadcrumbs stick. Also, press the breadcrumbs gently onto the chicken instead of just rolling. If they’re still not sticking well, try chilling the chicken between each coating step.
Q3: Can I use different flavors in the butter?
Absolutely! Try adding different herbs like dill, thyme, or basil. You can also add lemon zest, a tiny bit of mustard, or even some very finely chopped sun-dried tomatoes. Just make sure whatever you add is chopped very small, or it might be hard to keep the butter inside the chicken.
Q4: Can I add cheese to my air fryer chicken kiev?
Yes, and it’s super tasty! Add a small slice of cheese like mozzarella or Swiss along with the garlic butter before rolling up the chicken. Just be careful not to overstuff, or it might burst during cooking.
Q5: Can I use chicken thighs instead of breasts?
Sure! Chicken thighs work great too. They might be a bit harder to flatten evenly, but they stay juicier. You’ll need to butterfly them first (cut them open like a book) before flattening. The cooking time might be a little different, so make sure the inside temperature reaches 165°F.
Q6: Can I make this air fryer chicken kiev ahead of time?
Yes! You can prepare everything up to the coating step and keep the uncooked, breaded chicken in your fridge for up to 24 hours. Just make sure to cover it well with plastic wrap.
Air Fryer Chicken Kiev
Ingredients
For the garlic butter:
- 4 tbsp unsalted butter, softened
- 2 garlic cloves, finely minced
- 1 tbsp fresh parsley, chopped
- ½ tsp salt
- ¼ tsp black pepper
For the chicken:
- 4 boneless, skinless chicken breasts
- ½ tsp salt
- ¼ tsp black pepper
- ½ cup all-purpose flour
- 2 eggs, beaten
- 1½ cups breadcrumbs
- Cooking spray
Instructions
- Make the garlic butter: Mix the softened butter, minced garlic, chopped parsley, salt, and pepper in a small bowl. Form the mixture into a rectangle on plastic wrap, roll it up, and put it in the freezer for 15 minutes.
- Prepare the chicken: Put each chicken breast between two pieces of plastic wrap. Use a meat mallet to gently pound the chicken until it's about ¼ inch thick.
- Add the butter: Take the butter from the freezer and cut it into 4 pieces. Put one piece of butter in the center of each chicken breast. Fold the sides of the chicken over the butter, then roll it up like a burrito. Make sure the butter is completely covered.
- Coat the chicken: Set up three shallow bowls – one with flour, one with beaten eggs, and one with breadcrumbs. Roll each chicken in flour, then dip in egg, and finally coat with breadcrumbs. Press the breadcrumbs gently to help them stick.
- Chill: Put the coated chicken in the refrigerator for at least 30 minutes to help everything stay together.
- Preheat: Turn on your air fryer and set it to 375°F. Let it heat up for 3 minutes.
- Cook: Spray the air fryer basket with cooking spray. Place the chicken pieces in the basket, making sure they don't touch. Spray the tops of the chicken with cooking spray. Cook for 10 minutes, then flip the chicken, spray again, and cook for another 5-7 minutes until golden brown and the internal temperature reaches 165°F.
- Rest: Let the chicken rest for 5 minutes before serving.
Notes
Other recipes you might like
Share Your Experience!
👩🍳Did you make this air fryer chicken kiev recipe? Please share your cooking journey with us!
Rate This Recipe
⭐️ Did you love this recipe? Be sure to leave a rating below!
🔹Let us know what you thought in the comments below, and let’s chat about your air fryer chicken kiev experience. Happy cooking!